Why Did My Fudge Not Set? Fixes That Work
You pulled the pan out, waited patiently, and still ended up staring at soft, glossy candy that slumps instead of slices. So, why did my fudge not set? Usually, it comes down to one of three things: the sugar syrup never reached the right temperature, the ingredient ratio was off, or the fudge was disturbed at the wrong moment while cooling. The good news is that unset fudge is rarely a total loss, and once you know what went wrong, your next batch gets a whole lot easier.
Fudge has always had a bit of kitchen drama built into it. It sits right between candy-making and baking, which is why it can feel surprisingly fussy for something so cozy and old-fashioned. Traditional American fudge became popular in the late 1800s, and from the start, its charm was the same as it is now – rich chocolate flavor, creamy texture, and that just-firm-enough bite that feels extra special on a holiday tray. But unlike a quick brownie batter, fudge depends on sugar behavior, and sugar does not forgive guesswork.
If you came here after asking yourself, why did my fudge not set, let’s sort it out like a home cook who wants better results, not a chemistry lecture. I’ll walk you through the common causes, how to rescue a soft batch, and a reliable chocolate fudge recipe description you can use when you want a version that actually firms up.
Why did my fudge not set? The most common reasons
The biggest culprit is undercooking. In classic stovetop fudge, the mixture needs to reach the proper stage so enough water evaporates and the sugar concentration is right. If you stop too early, the fudge stays too loose. It may taste great, but it will settle like frosting instead of holding a clean square.
Temperature matters more than time here. One stove runs hot, another runs lazy, and one saucepan holds heat better than the next. That is why recipes that say “boil for 5 minutes” can still leave you with a pan of chocolate spread if the mixture never actually reached the correct temperature.
The next issue is ratio. Too much butter, too much liquid, not enough sugar, or extra chocolate added without adjusting anything else can all keep fudge soft. Sweetened condensed milk fudge is a little more forgiving than old-school boiled fudge, but even easy fudge recipes can fail if you eyeball ingredients.
Then there’s the cooling stage. Fudge needs structure to form properly. If you stir too early, beat too long, or move it around while it is trying to set, the texture can go grainy, greasy, or oddly loose. It depends on the recipe, but timing matters.
Humidity can also mess with you. On a damp day, sugar pulls in moisture from the air. It’s not always enough to ruin a batch, but it can absolutely contribute to fudge that stays softer than expected.
Ingredients for a reliable chocolate fudge
If you want a dependable batch after one that flopped, start simple. This recipe description gives you a classic, sliceable chocolate fudge with a creamy texture and deep cocoa flavor. It’s rich, old-fashioned, and ideal for holiday cookie boxes, dessert platters, or that secret square you save with coffee after dinner.
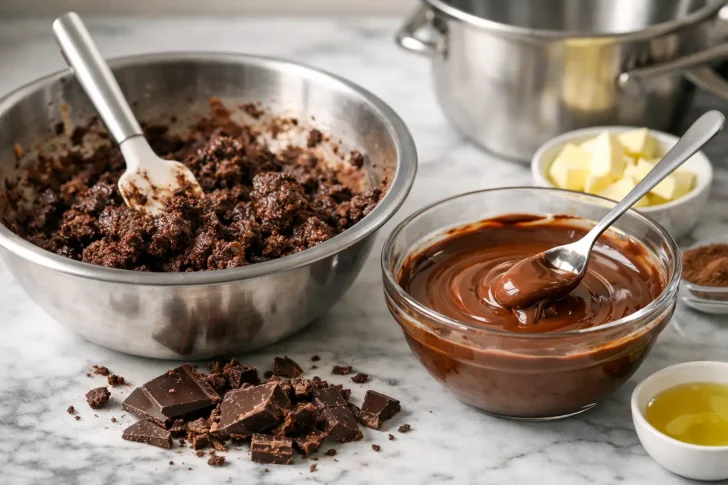
You’ll need granulated sugar, unsweetened cocoa powder, whole milk, unsalted butter, light corn syrup, salt, vanilla extract, and chopped semisweet chocolate. The corn syrup helps reduce unwanted crystallization, and the chopped chocolate adds extra body and smoothness.
Tools and equipment you’ll need
Use a heavy-bottomed medium saucepan, a wooden spoon or heatproof spatula, a reliable candy thermometer, an 8-inch square pan, parchment paper, and a sharp knife for cutting. You can make fudge without a thermometer, but if you’re troubleshooting why did my fudge not set, this is not the moment to freestyle.
How to make fudge that sets properly
Line your pan with parchment and lightly butter it if you want extra insurance against sticking. In the saucepan, whisk together the sugar, cocoa powder, milk, butter, corn syrup, and salt. Bring the mixture to a boil over medium heat, stirring until the sugar dissolves.
Once it reaches a full boil, stop casual stirring and clip on the thermometer. Cook until the mixture reaches 234 to 236 degrees Fahrenheit, which is the soft-ball stage for this style of fudge. If your thermometer reads low or high, even by a couple of degrees, that can change everything, so it’s worth testing it in boiling water beforehand.
Remove the pan from the heat and add the vanilla and chopped chocolate, but do not beat it like cake batter. Let it cool undisturbed until it drops to about 110 degrees Fahrenheit. This part feels slow, but it matters. If you stir too soon, crystals can form badly and the texture goes off.
When it has cooled enough, beat the mixture until it thickens, loses some of its shine, and starts looking more matte. Then quickly spread it into the prepared pan. Let it set at room temperature until firm, then cut into squares.
That’s the sweet spot – cooked enough to hold, cooled enough to crystallize correctly, and beaten just enough to become creamy instead of runny.
How to fix fudge that didn’t set
If your fudge is still soft after several hours, first give it more time. Some batches simply need overnight rest, especially if your kitchen is warm. But if it is clearly too loose to cut by the next day, you have a few options.
The best fix is to re-cook it. Scrape the fudge back into a saucepan with a small splash of milk or cream – usually 2 to 4 tablespoons is enough. Warm it gently until smooth, then bring it back to the proper temperature. This gives the sugar system a second chance to land where it should have the first time.
If the texture is delicious and only a little too soft, repurpose it. Spoon it into jars as hot fudge sauce, use it as a brownie topping, swirl it into ice cream, or roll chilled scoops in cocoa powder for truffle-style treats. Listen, I get it – sometimes the smartest kitchen move is calling it a different dessert and taking the win.
If your fudge is greasy rather than loose, the fat may have separated. That can happen from overheating, sudden temperature shifts, or too much agitation. Reheating gently with a little milk can sometimes bring it back together, but not always perfectly.
Small mistakes that lead to big fudge problems
One very common issue is scraping every bit from the saucepan into the pan. It sounds thrifty, but sugar crystals clinging to the sides can seed the whole batch and throw off texture. Another problem is making substitutions that seem harmless. Evaporated milk is not sweetened condensed milk. Salted butter changes the balance. Low-fat dairy can make the result less rich and less stable.
Chocolate choice matters, too. Cheap chocolate with lots of additives can behave differently than a good semisweet bar. Chocolate chips are handy, but because they’re designed to hold shape, they can melt less smoothly than chopped baking chocolate.
And yes, your thermometer might be lying to you. If you’ve been wondering why did my fudge not set even though you followed the recipe exactly, test the thermometer first. A bad reading is one of the sneakiest reasons fudge recipes fail.
Final texture, plating, and serving ideas
When your fudge is set properly, it should cut cleanly with a slight give in the center. It should feel creamy on the bite, not dry, crumbly, or sticky like icing. For serving, trim the edges if you want neat dessert-board squares, then stack the pieces on a small platter or wrap them in parchment for gifting.
For a dressed-up finish, sprinkle flaky sea salt on top before the fudge fully sets, or add toasted pecans, crushed peppermint, or a drizzle of melted white chocolate once it is firm. If you love holiday baking, this is one of those recipes that looks far fancier than the ingredient list suggests.
Extra tips and ingredient variations
If you prefer a deeper flavor, swap a small portion of the semisweet chocolate for bittersweet. If you want a sweeter, softer style, use all semisweet and add mini marshmallows at the end in a different no-boil version. Just know that quick fudge and traditional fudge are not interchangeable methods. One relies on marshmallows or condensed milk for structure, while the other depends on precise sugar cooking.
For peanut butter chocolate fudge, swirl in a few tablespoons of creamy peanut butter after cooking, but do not go overboard or you’ll loosen the set. For mocha fudge, dissolve a teaspoon of espresso powder into the milk before heating. Tiny changes work better than dramatic ones when texture is on the line.
FAQ
Why is my fudge still soft after cooling?
It was likely undercooked, or the liquid-to-sugar ratio was too high. Warm kitchens and humid weather can also slow setting.
Can I put fudge in the fridge to make it set?
Yes, but it won’t fix undercooked fudge forever. Chilling can firm it temporarily, yet truly soft fudge often turns loose again at room temperature.
How long does fudge take to set?
Most fudge sets in 3 to 5 hours at room temperature, though some batches do better overnight.
Can I remake fudge that did not set?
Absolutely. Reheat it with a little milk, bring it back to the correct temperature, cool it properly, then beat and pour again.
Why did my fudge turn grainy instead of creamy?
That usually happens when sugar crystals formed too early, often from stirring at the wrong time or from sugar on the sides of the pan.
A batch of fudge that doesn’t set can feel annoying, especially when you were already picturing perfect little squares on the counter. But once you nail the temperature, keep the ratios honest, and give the cooling stage the patience it deserves, fudge goes from temperamental to dependable – and that first clean slice feels ridiculously satisfying.