Make Delicious Chocolate Peanut Butter Dessert Recipe in 5 Steps
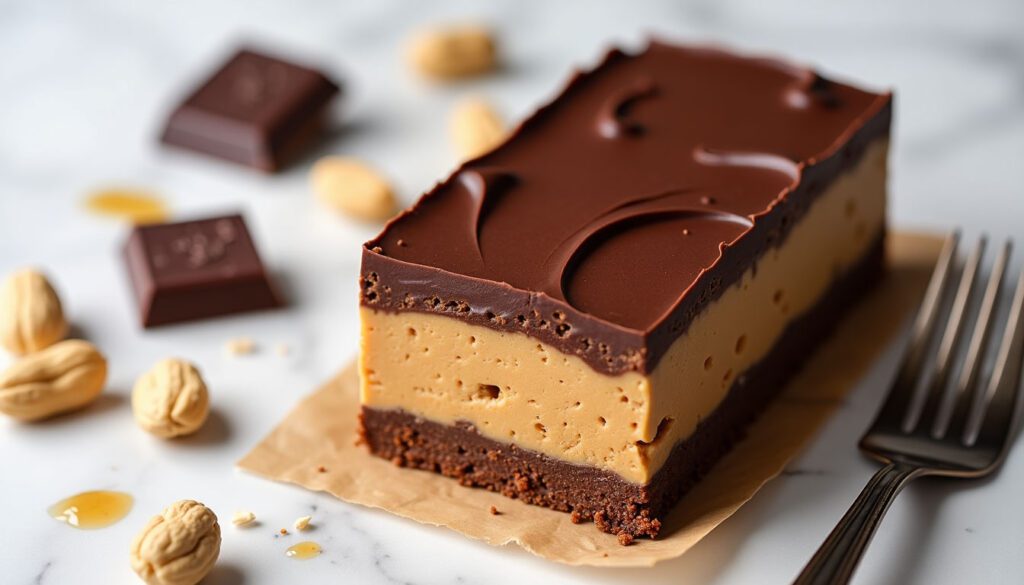
Did you know that chocolate and peanut butter is America’s #1 favorite flavor combination, with over 120 million pounds of Reese’s Peanut Butter Cups sold annually?
This classic pairing has captured taste buds for generations, and for good reason. The rich, smooth chocolate perfectly complements the salty-sweet, creamy peanut butter, creating an irresistible treat that satisfies both chocolate lovers and peanut butter enthusiasts alike.
Want to recreate this magical combination in your own kitchen? Our chocolate peanut butter dessert recipe transforms simple ingredients into a show-stopping treat in just 5 easy steps. Whether you’re planning a special occasion or simply craving something sweet, this recipe delivers professional-looking results without complicated techniques.
Ready to make your own chocolate-peanut butter masterpiece? Let’s get started!
Essential Ingredients for the Perfect Chocolate Peanut Butter Dessert
Creating the perfect chocolate peanut butter dessert starts with selecting premium ingredients that work harmoniously together. Let’s explore the essential components that will elevate your recipe from good to extraordinary.
Choosing the Right Chocolate Type
The foundation of any chocolate peanut butter dessert lies in selecting the proper chocolate. For optimal results, look for chocolate bars in the 70% range, as they provide the perfect balance of sweetness and rich cocoa flavor. While supermarket chocolate chips are convenient, bars often prove superior for baking.
For this recipe, consider these chocolate options:
- Semisweet (60% cacao) – Ideal for balanced sweetness
- Bittersweet (70% cacao) – Perfect for deeper chocolate flavor
- Dark chocolate (up to 80%) – Best for intense chocolate lovers
Selecting the Best Peanut Butter
When it comes to peanut butter selection, processed varieties like Skippy or Jif typically work better in dessert recipes than natural alternatives. These processed versions provide better texture and consistency in the final product.
For best results, choose a peanut butter that’s:
- Creamy and shelf-stable
- Contains minimal ingredients
- Has a consistent texture
Additional Ingredients and Substitutions
While chocolate and peanut butter are the stars, supporting ingredients play crucial roles too. For those with dietary restrictions, several substitutions are available:
For peanut butter alternatives, consider:
- Almond butter or other nut butters
- Sunflower seed butter for nut-free options
- Tahini for a unique twist
The quality of your ingredients significantly impacts the final result. When selecting chocolate, bars from well-stocked supermarkets often represent a major step up from basic baking aisle options. Similarly, while natural peanut butter might be healthier for everyday use, traditional processed varieties typically yield better results in dessert recipes.
Remember that milk chocolate, while popular, contains only 10% cocoa content according to FDA requirements. For a richer chocolate experience, opt for varieties with higher cocoa percentages, which provide more intense flavor and better baking properties.
Preparing Your Kitchen and Tools
Success in creating the perfect chocolate peanut butter dessert begins with proper preparation and organization. Let’s set up your kitchen for an efficient and enjoyable cooking experience.
Required Equipment List
Before starting, gather these essential tools for your chocolate peanut butter dessert:
- 9×9-inch square baking pan (or 8×8-inch alternative)
- Food processor with blade attachment
- Parchment paper or non-stick aluminum foil
- Mixing bowls (various sizes)
- Electric mixer or hand whisk
- Measuring cups and spoons
- Rubber spatula
- Microwave-safe bowl
Ingredient Preparation Tips
Proper ingredient preparation is crucial for achieving the best results. Allow cream cheese to soften at room temperature for about one hour before starting. This ensures smooth mixing and prevents lumps in your final dessert.
For chocolate preparation, coarsely chop your chocolate bars rather than using chips, as this will result in better melting consistency. If using peanut butter, ensure it’s at room temperature for easier mixing and better incorporation with other ingredients.
Setting Up Your Workspace
Follow these steps for an efficient workspace setup:
- Clear and clean your largest possible work surface
- Arrange frequently used supplies within arm’s reach
- Line your baking pan with parchment paper, ensuring overhang on opposite sides for easy removal
- Pre-measure all ingredients and arrange them in order of use
- Keep a clean, damp cloth nearby for quick cleanup
Pro Tips for Workspace Efficiency:
- Layout your design and determine ingredient placement before starting
- Set up different stations for mixing, melting, and assembly
- Position your tools and ingredients in the order you’ll need them
- Ensure proper lighting in your workspace
- Keep trash bin and paper towels easily accessible
Remember to take time laying out your workspace a day or two before making the dessert. This advance planning will help you stay organized and stress-free during the actual preparation process.
Creating the Chocolate Base Layer
The foundation of any chocolate peanut butter dessert lies in properly preparing the chocolate base layer. Mastering this crucial step will ensure your dessert has that professional-quality finish and irresistible taste.
Melting Chocolate Properly
The key to melting chocolate is maintaining precise temperature control. Dark chocolate should never exceed 120°F, while milk and white chocolate must stay below 110°F. Choose between two reliable melting methods:
- Microwave Method:
- Place chopped chocolate in a dry bowl
- Heat in 30-second intervals at 50% power
- Stir between each interval
- Stop when 80% melted and stir to complete
Achieving the Perfect Consistency
For the ideal chocolate base layer, temperature precision is crucial. The optimal melting points are:
- Dark chocolate: 31-32°C (88-90°F)
- Milk chocolate: 30-31°C (86-88°F)
- White chocolate: 27-28°C (81-82°F)
Pro Tip: Add a spoonful of vegetable or coconut oil to achieve the perfect spreading consistency. This helps create a smooth, even base layer that’s neither too thick nor too thin.
Common Chocolate Pitfalls to Avoid
Understanding potential issues helps prevent common mistakes when creating your chocolate base layer. Here are critical points to remember:
- Moisture Control: Even a single drop of water can cause chocolate to seize, becoming grainy and unusable. Ensure all utensils are completely dry before starting.
- Temperature Management: Overheating chocolate leads to a thick, muddy consistency instead of the desired silky smoothness. Use an instant-read thermometer for precise temperature control.
- Humidity Concerns: Work in an environment with humidity below 50%. High humidity can cause your chocolate to develop a speckled appearance and set improperly.
If your chocolate does seize, don’t panic. Add warm water one teaspoon at a time while whisking vigorously until the mixture becomes smooth again. While this chocolate won’t be ideal for tempering, it’s perfect for creating your dessert’s base layer.
Remember that proper chocolate handling is essential for achieving that professional-quality finish. Take your time with this step, as it forms the foundation of your entire chocolate peanut butter dessert.
Mastering the Peanut Butter Layer
The perfect peanut butter layer is what transforms this dessert from ordinary to extraordinary. With the right technique and ingredients, you’ll create a creamy, smooth layer that perfectly complements your chocolate base.
Proper Peanut Butter Preparation
For the best results, select regular, smooth peanut butter rather than natural varieties. Natural peanut butter’s oil separation can affect the texture of your dessert. Your peanut butter layer will need:
- 8 ounces cream cheese (softened)
- 1 cup creamy peanut butter
- 1 cup powdered sugar
- ¼ cup milk
- 1½ cups whipped topping
Mixing Techniques for Smoothness
The secret to achieving that bakery-quality smoothness lies in proper mixing technique. Using a stand mixer fitted with a paddle attachment, beat the cream cheese with sugar, peanut butter, vanilla, and salt on medium speed until the mixture becomes creamy and light, approximately 5 minutes.
For perfect consistency, follow these steps:
- Beat cream cheese and peanut butter until completely smooth
- Gradually incorporate powdered sugar and heavy cream
- Mix until the texture is light and fluffy
- Fold in whipped topping gently to maintain airiness
- Continue mixing until fully incorporated
Layer Assembly Tips
Temperature Control: Ensure your chocolate base is completely set before adding the peanut butter layer. The cream cheese should be at room temperature for optimal mixing.
Spreading Technique: Use an offset metal spatula heated under hot water to achieve a perfectly smooth surface. This professional technique helps create those clean, defined layers that make your dessert visually stunning.
Layer Thickness: When spreading the peanut butter mixture, leave approximately ½-inch from the edge free of frosting. This prevents overflow and creates cleaner, more professional-looking layers.
Pro Tip: For extra indulgence, consider adding chopped peanut butter cups between layers. This adds texture and enhances the peanut butter flavor profile.
Remember to seal off any holes on the edges when spreading to prevent seepage between layers. This attention to detail ensures each slice will showcase distinct, beautiful layers when served.
Presentation and Serving Suggestions
The visual presentation of your chocolate peanut butter dessert can transform it from a simple homemade treat into a restaurant-worthy masterpiece. Let’s explore how to achieve that professional finish that will wow your guests.
Decorative Finishing Touches
The right decorative elements can elevate your dessert’s visual appeal dramatically. According to professional pastry experts, your garnishes should always be edible and complement the dessert’s flavors. Consider these elegant finishing touches:
- Fresh seasonal berries
- Crushed peanuts
- Chocolate shavings
- Edible flowers
- Mint leaves
- Whipped cream swirls
- Drizzled chocolate
Pro Tip: When adding decorative elements, remember that less is more. A single amarena cherry or fresh strawberry cut in half often creates more visual impact than excessive ornamentation.
Plating Techniques
Professional plating transforms your chocolate peanut butter dessert into an Instagram-worthy creation. Studies show that 87% of Gen Z thinks about dessert at least once daily, with 46% having dessert photos on their phones. Follow these expert plating steps:
- Start with a clean, plain white plate to make your dessert stand out
- Position your main dessert piece slightly off-center
- Add sauce decorations using a squeeze bottle
- Place garnishes strategically for color contrast
- Ensure all components are at proper serving temperature
For an artistic touch, try using a squeeze bottle to create elegant chocolate swirls or geometric patterns on the plate. Remember to maintain some white space – overcrowding the plate can diminish the visual impact.
Storage Guidelines
Proper storage ensures your chocolate peanut butter dessert maintains its quality and presentation. Here are the essential storage parameters:
Refrigerator Storage:
- Store in an airtight container for up to 1 week
- Keep individual pieces wrapped separately
- Maintain temperature consistency
Freezer Storage:
- Can be frozen for up to 3 months
- Thaw in refrigerator for 10-15 minutes before serving
- Store between sheets of parchment paper
Serving Temperature Tips: When serving at parties or events, remember that these desserts should not be left at room temperature for more than 30 minutes. For optimal presentation at events, consider serving straight from a cooler to maintain the perfect consistency.
Temperature Considerations: The dessert may become quite firm when frozen, so allow adequate thawing time before serving. For the best texture and flavor, let frozen pieces stand at room temperature for 10-15 minutes before serving.
Remember that proper storage not only preserves the taste but also maintains the visual appeal of your creation. When preparing for special occasions, you can make this dessert ahead of time and store it appropriately, making it perfect for parties, picnics, and bake sales.
Conclusion
Creating the perfect chocolate peanut butter dessert requires attention to detail, from selecting premium ingredients to mastering proper techniques. Your success depends on careful preparation, precise temperature control, and patient execution of each layer.
Professional-looking results come from understanding the crucial elements – quality chocolate selection, proper peanut butter consistency, and expert presentation techniques. Storage guidelines ensure your dessert maintains its appeal whether served immediately or prepared in advance.
Armed with these detailed steps and expert tips, you can confidently create this classic dessert that rivals professional bakery offerings. Remember that practice makes perfect – each time you make this recipe, your technique will improve, leading to even more impressive results that will delight family and friends.
You might also like: Coffee and Ginger, Hazelnut, Fig and Chocolate Spelt Cantuccini



One Comment